Sunday, December 11, 2011

Momentous Preparations pt. 2

Continuing on from yesterdays post, today was the day of removing the engine and gearbox.  Massive thanks to both Kim and Casey for their help today.  First thing was to make the final few preparations in order to make this possible.  Couldn't do them yesterday just because it meant things would be loose, so a quick socket session was required.


Gearbox mount was the first thing to be removed.... all it does it make sure the gearbox doesn't move in relation to the chassis.... Could have been problematic given that we wanted to move the gearbox in relation to the chassis =P so it was abruptly removed.


Also had to remove the engine mounts.  The bolts are in an incredibly hard to reach spot, which wasn't made easier by the jack stand that was supporting the front end of the car, or the jack that was supporting the gearbox.  Simply getting the socket over the bolt was tricky enough, let alone trying to remove it!  All 3 of us had a go, 20 minutes later we finally got the problem child out.


Casey getting the strap and crane ready to lift the engine out... 


Final checks before the lifting begins... basically the strap is pre-tensioned to make sure that both the strap and the knots are capable of lifting the engine and gearbox out, and seeing if there's anything I'd forgotten from yesterdays escapades.  Turns out I had... clutch slave cylinder (effectively connects your clutch pedal to your clutch) and the heater hoses.  It does need to be said though, the heater hoses were intentional - the extra room provided by moving the engine forward gave us that little bit extra room to make the removal of the hoses comfortable. 


The idea is that as you lift the engine, you first need to make sure the mounts come out clean before you can go any further.  They should come out in 1 piece... For those that don't know, they're NOT meant to look like this!!!  For whatever reason, this mount hasn't been doing its job for an unknown period of time... Lazy ass engine mounts.  Time for some new ones I think!


All of us making sure that the engine wasn't going to foul on anything as we pulled it out.


Engine and gearbox being pulled out as one whole unit.  From what I understand, having no front end on the car made it unbelievably easy to pull out.  Pity that when it goes back in, this won't be the case...  We did have some clearance issues with the power steering rack, but other than that it was pretty smooth sailing.


Kim appreciating a Nissan engine in its entirety.


The resulting cavity from pulling it all out.  Amazing how roomy it is, although I suspect that may have something to do with the fact that structurally there's not a lot else left....


The engine in its new home... While it's out, I'll be taking the opportunity to refurbish it a bit.  Replace seals, clean it up, address some outstanding issues etc.


What can I say... feels good to drive her again ;)


And its about this time that the storm rolled in... Cue an afternoon of chilling in the garage on spare tyres, drinking beer, listening to music and some all round good times :)  Not a bad way to spend a Sundy arv!!!

Once again, thanks to Casey for the loan of his engine crane, Kim for the loaning of his van to pick up said engine crane, and the both of them for their help, extra set of eyes and general awesomeness!  Now that this is done, the next step is to tackle the final tidy up before she gets taken into the smash repairers.  Stay tuned.

Saturday, December 10, 2011

Momentous Preparations pt. 1

This week saw the successful booking in of Edna into a workshop between Christmas and New Years to get her new front end put on!  Thanks to some suggestions from friends, looks like Adrenalin Motorsports will be doing the dirty deed :)  It will be pending on a quote at this stage, because I'm still not sure how much its going to cost to do such a job.  Have to be prepared that the cost of repairing her will be too much, but it is indeed a start.

Anyways, in the attempt of keeping potential costs as low as possible, the aim is to strip as much as I can so that she can get pretty much dropped in and they can get straight to work.  Over the last couple of months, this has been happening in small steps, but I haven't committed too much because the priority has always been to find someone who can do the work.  Now that that has been (potentially) confirmed, the biggest thing is getting the engine and gearbox out.  Pre-emptive thanks to Casey for offering his time and engine crane to get it out (tomorrow's job), but in order to do that, a few things had to be done first.


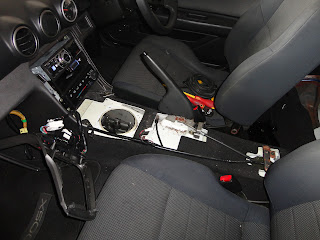
First step was to remove the gear shifter...  Easy enough, although had to laugh that the engineers put 2 of the bolts that secure the shifter to the gearbox in a place that isn't accessible through the hole... I mean, really?  Nothing a flexible spanner can't fix though.  For those that don't know, the general idea is that the engine gets pulled out with the gearbox still attached, hence the necessity to remove the shifter.


Even after 2 and a half years of owning this car... still get a kick out of seeing this...


Having the car on 3 candlesticks still see's the final wheel quite clearly off the ground... gotta love how stiff the chassis is!!!


Given that its been so long since I've been under the car, forgot about this... Yes officer, my car is soooo a legal height ;)


For those of you that know, Edna had a habit of flaming quite a bit.  Now another part of getting the engine ready for being pulled out is to remove the exhaust.  Easy enough, but given how much she flamed, thought it would be very interesting to see what the inside of the exhaust was looking like... Yep, it's burnt alright!!


Tail shaft comes out next.  Provides power from the gearbox to the rear axle, and given that the gearbox is being removed, it couldn't stay in.  I wanted to detach it in the middle, because that would've been a hell of a lot easier. Unfortunately, try as I might, and because of the proximity of the bolts to the tailshaft, I couldn't get the ring end of a spanner on any of the bolts, only the crescent end.  This meant I couldn't undo the bolts without risking stripping them (given how tight they were on), so had to take it off from the rear instead.  Even then, it took 2 spanners linked together for the extra torque, using both arms and a foot on one of the rear wheels for extra force.  Sure it's nice to know that it wouldn't fall off in a million years, but seriously?


The growing pile of parts that have already been pulled off that I can still use...


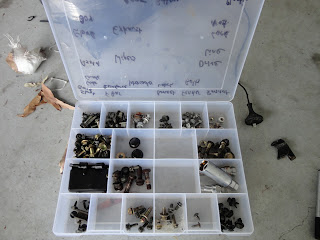
And allllllllllll the screws associated with it...


Just had to share this... While cleaning up, found a screw driver on the other side of the garage that I'd been using.  Instead of simply walking over and putting it in, I decided to test my skills by throwing it from where I was and seeing if I could get it in... As you can tell by the picture, I did miss, but could not stop laughing at what happened instead =D


The final step was to disconnect as much as I could from the engine, so it would come out without pulling anything with it.  You can see all the plugs, looms, wires and pipes sitting up the top out of the way, now to try and remember where they all go in a couple of months time!

And so concludes the days work!  Stay tuned for part 2 tomorrow when Casey, Kim and I pull out the engine and gearbox ;)

Monday, November 28, 2011

All in the name of safety (or lack there-of)

So the last couple of days have seen some great progress in terms of moving forward!  Been trying to keep my ear to the ground for a new front cut, and after some talking to some people and some ringing around and some posting, found out I can also use an S14 front end, as structurally they're very similar, which opened up a fair few doors.  Saturday morning saw me pick this up...


S14a Front Cut... admittedly would've liked the towers as well, supposedly missed them by only a day... but cannot complain at all for only $150.  Includes Reo (which I needed), front loom (current plugs got smashed/damaged in the accident, so I needed them too) and chassis rails (which I DEFINITELY need).  Also got the opportunity to introduce my girlfriend properly into the world of buying car parts... get used to it Babe :) haha...


Also picked this up... 2nd hand Cooling Pro radiator... 42mm, $180... Ideally I wanted to wait til the front end was sorted before I started buying parts, but a decent radiator this cheap?  Simply couldn't pass that up!!


Anyways obtaining the front end actually gave me some motivation to get my ass into gear in regards to making some progress.  The biggest priority at the moment is to get the engine/gearbox out ready for the smash repairers, but to do that I need an engine crane, so while I sort that out I decided to get some other things done...  First thing was to get rid of the windscreen... Lucky for me, my neighbour does it for a living, so $30 later saw the removal of one windscreen that was touched inappropriately by an airbag.  The good news was the frame wasn't buggered in the accident, so that helps.  Also set about finally removing the airbag.  Result?


This.  Picture more or less says it all :)


Not sure how I'm going to fill the hole though... the panel that the airbag popped out of left a bit to be desired...


Sitting in a car upside down is totally the new black... 


Rear seat removed as well to get rid of the airbag module, you can see it sitting there ready to be evicted from my car.  Eventually I'll be taking the seats out permanently when I start getting her ready for the track, but to be perfectly honest I definitely have bigger fish to fry at the moment...


This is said airbag module.  Things that make you go Boom!!!  Crazy how light this thing is... But from what I can work out, this houses the electronics that sense if theres an accident and deploy airbags accordingly.  Given that I now have 0 airbags left, I think it's safe to say that its time in my car is limited.


And finally a video of the car starting and idling properly.  Please ignore the lumbering fool trying to navigate the cabin.  Props to Tobias (me neighbour) who helped my plug a few things to see if we could get the engine running properly, just as verification that all that actually works.

From here, next step is to get the engine and gearbox out, as well as a few more things inside as well to get her ready for the smash repairers.  Stay tuned, updates should be coming thick and fast from now :)

Tuesday, October 25, 2011

PROGRESS!!!

So... after a hell of a lot of being wayyyyy too busy, I finally got around to spending some more time on Edna (been more than a month since I last did anything), and over the last month I've been spending a lot of time just trying to figure out what I wanted to do.  Looked into getting a track shell (seller decided he didn't want to sell after all), been looking into wrecked cars (problem is most of them aren't re-registerable), or even parting everything out and starting afresh.  The most frustrating part was being in Germany for 2 weeks on my own.  Very bored, lots of spare time and nothing productive I could do... ah well.

I finally got some time today to do something though.  One thing I did try very briefly back before I left for Germany was to see if I could get her to just start... I didn't want to go to all the effort of fixing her to find out that the engine was buggered.  I had big issues with the wiring as it was a complete mess, and the mechanic's manual wasn't overly helpful.  Blew the ignition fuse straight up, blew another one, tried bypassing it but ended up completely melting the wire I put in its place...  So I've been scratching my head for quite a while just working out what was going on.

Anyways here we are today.  Went and bought a circuit breaker this time (140A as opposed to 100A... bit overkill but it was either that or 60A!) so that I wouldn't keep wasting money on fuses.  Unplugged everything and started again... an hour later I was exactly where I was previously (sigh), still having no idea what was causing the fault.  Multimetered the hell out of the electrics to try and find shorts, verify continuity etc, that didn't provide me with any answers either.  Tried googling s15 engine bays to see if I was missing something but that was just as futile.  And so began the wire tracing, working out exactly where each wire was going as opposed to seeing what I could just match up based on plugs.

Another hour later, I'd found the culcript - the loom from the alternator was originally grounded, but it needed to be connected to the fuse box.  I didnt pick up on it because the accident destroyed anything structurally in that area, so I just assumed that the ring terminal meant a chassis termination... I was wrong!!  After checking that I had power in the car, it was time to try again...


Now the video doesn't really explain that much, so let me go into some further details.

Wipers sounded like crap because of the cracked windscreen, but also combined with the fact that there's a massive sticker still on it from the accident... not to worry though.  But she starts first time!!! With absolutely no hesitation what soever... I was definitely amazed :)  Now the engine does sound like crap, that's partly due to the microphone being overloaded... but also due to the fact that I've got that many components disconnected from the engine, I'm surprised it even turned over at all.  Basically all the sensors that read air flow are missing, so she has real issues idling...

Honestly though?  That will be fixed with time.  I know that the engine is capable of turning over and running =D and that's all I wanted to verify!  Now I know for certain what avenue will be pursued in fixing her, and that will be sourcing a front shell, pulling everything out and welding this new shell on.  But while I'm at it, I'll also take the opportunity to do some critical things such as rebuilding the engine, replacing the water pump and the engine mounts, plus a few other bits and pieces that would be too hard to do normally... 

The first step will be to pull out the engine and gearbox, and get the front end sorted structurally.  From there, its just a case of acquiring parts and putting her back together.  But I now know what completely where I stand.  I now know what needs to happen to move forward based on the condition of everything.


Looking at this picture, its an absolute mess.  But to quote the late Big Kev, "Iiiiiii'm exCITED!!!!!"

Oh and one last picture...


My very crudely modified engine loom :)  

Friday, September 23, 2011

The End of Week One...

So... a week today since the crash.  And the saying that life goes on couldn't be any truer.  Saturday saw me working 8 hours up in Brisbane, Tuesday was out in Toowoomba, Thursday was a full 14 hour day, plus working around a trip to Sydney this weekend for my lovely sister's 21st Birthday Party.  Coming up is a full week of work, followed by a weekend of work, and a 2 week work trip to Germany... But I digress.  There's also some saying about making time for the things you love so I'm going to go with that :)

This week has seen some good progress in spite of everything.  The main aim here was to get the shell rolling so we can at least start getting things back to normal at our house, and get some garage space back.

The first step was to cut out the damaged guard.  Due to how far back it had been pushed, it was impossible for the wheel to fit without damaging it.  Just getting it out in the first place was hard enough, and required us to pretty much deflate it completely.

The damaged guard was a bastard to cut out, and required some creative grinding/crowbaring due to the amount of creases in the guard, as well as the multiple layers of metal that had to be cut simultaneously.  


This was the cut out section... Crazy to see that much metal compressed in such a manner!! Definitely gives new meaning to the term 'compact car' =P.


Suspension wise, this was the only thing that I could visually find.  One hell of a bent tie rod!!!  For those that don't know what a tie rod it, it connects your steering rack to the wheel hub, and explains why the wheels were pointing in opposite directions.


$130 for some new steering rack ends and tie rods, some more getting covered in grease and other crap, and the result?  A rolling car :)  After piecing her back together though, worked out there is a little bit more damage to the front right then I'd thought, but hopefully a new front end will sort that out.  For the time being though, both front wheels fit and roll easily, so I'll take that for what its worth.


In the process of moving her, I found this little gem inside the car... Kinda like it, reminds me of just what she's been through.


Love this last shot I managed to get right before the sun set.  Kinda looks rat-rod-ish =D 

After having a full week to properly look at things and suss everything out, I've managed to start sorting a list of needs, wants, and ways to rape my bank account...  However in order to get her at least drivable again?

Whole new front shell inc. straightening of the chassis, windscreen, front fenders, reo, headlights, front bar, radiator, intercooler, battery, pod filter, fusebox and alignment!!

Not too much to ask I don't think :) 

Monday, September 19, 2011

... and New Beginnings


After a fun weekend of waiting for monday (why can't smash repairers be open on Saturday/Sunday SERIOUSLY!!) Finally got her back to my place.  Always fun moving a car whose front wheels are pointing in opposite directions, with the front right not moving at all (got crushed behind the wheel well).  Theo the towy did a very good job of getting her properly in the garage so that we could still shut it!!  Someone purposefully backing into you in order to push your car back?  Yeh why not :)


This was the first time I could properly see what the extent of the damage was.  Couldn't really see a lot on Friday night, and to be honest I was in too much shock to take anything in.  Pretty sorry sight I'm sure you'll agree...


Whats left of my electronics... REALLY not looking forward to sorting all this out.  To add insult to injury, the battery itself is only 3 weeks old, same with the carbon diffuser.  Goodbye $350 that I didn't get to appreciate properly (sigh)


This pretty much just sums everything up.  So much stuff broken, so much damage that its truly depressing to look at.
BUT, couldn't let this stop me.  Wanted to assess just how bad the damage was.  Began with removing as much stuff as I could, with the angle grinder making an appearance here and there.  After a fair bit of crap had been removed, it was time to take stock and see where I was at.


Suspension wise, this is the only thing wrong with her!!!  One bent steering arm.  No idea if there's more damage elsewhere, but visually this was the only real problem I could find.  The front right chassis rail is obviously in dire need of attention, however all damage to it is in front of the axle, so got off lucky there.


What I'd achieved in 5 hours...  It's a pity the bonnet came off last, because it really does hide how many brackets, supports, and many other metallic items such as the cooler core and radiator are under there.  Should hopefully get at least something for all that destroyed metal.


From the left... damage here isn't too bad all things considered


From the right - here you can definitely see just how bad it is.  However the damage is more or less limited to in front of the strut towers.  The engine itself is fine too, so thats another win!

Verdict?  She will live once again... I'm not going to leave her in such a state when she can be fixed, and at a price that would probably be similar to reshelling what I've got currently.  While yes, there is a lot that needs doing, keep this in mind.  In the coming week I was already looking at a new bonnet, a new radiator, and a few other goodies.  However this now is a perfect opportunity to do a few other things such as an engine & turbo rebuild, throw on some wider fenders, get a new front bar etc etc.  Plus the wheels, suspension (for the most part), interior and drivetrain is all good - so the motivation is really not there to part her out or reshell her.

That said, this will be long and drawn out.  The next month and a half is already taken up with prior engagements, and getting the money to do all this will also take some time.  Still not going to take out a loan - no, this will be all my hard earned money, and my previous time going into her.  

Cannot wait to see where this takes me :)

Unexpected Endings...

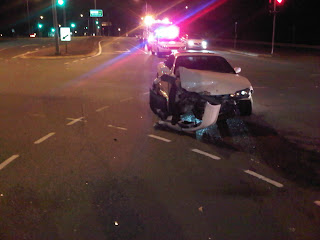
So had a bit of a bingle on the way back from tennis on Friday night... It was my fault, on the intersection of Dreamworld Parkway and Hope Island Rd.  For those that know the intersection, you'll understand the next bit 100%.  For those that don't, the intersection has 3 sets of traffic lights all within 100m of each other.  Long story short, I wasn't focused, saw a set of green lights (unfortunately not mine) and went - right into an oncoming car.  It was an honest mistake, both the cops and towy confirming it.  I honestly believed right up until my car came to a stand still and I was able to look at the lights that the other car was running a red light... so much for that.  Here's the damages...


You would not believe, looking at the photos of these 2 cars, that they were involved in the same accident.  Pretty sure though that because my car was so low, it's bypassed all of their front end and just collided solely with their front tyre.  I've only got 3rd party property, so at least they're covered...


Fluked this shot on Sunday.  Autofocus fail, however photo win.  Really sums up everything.