I've finally had some of those parts arrive that I've been banging on about for a while, and it could not have been better timing! Spare time on the weekends still seems to be eluding me, but as I learnt today it all comes down to making time. That said, a lot of it also comes down to having social events to attend to and not wanting to be too dirty or greasy =P Anyhow! With the arrival of a bunch of parts, motivation sky-rocketed and I decided to make some much needed progress.
Thanks to all the chopping and changing I have been doing in regards to whatever project has taken my fancy, room in the garage has become a bit like ocean-front living... next to no room left, with the room there is being sold to the highest bidder. Car parts are everywhere, and I mean EVERYWHERE. In order to simply walk around you're stepping over panels, brackets and parts all the while trying not to get any screws stuck in your foot. It truly is a much more expensive game of 'The Floor is Lava' we all used to play as kids :)
Let's take a look at what's arrived to add to my Lava game!
Item #1: New guards finally arrived from Japan. Unfortunately there was an ordering mishap and the rears turned out to be for the wrong car... thankfully this has been sorted out and is now just waiting on postal companies to do what they do best. Good thing I'm not in any real rush :)
Item #'s 2-5: Thanks to TAARK, I've sourced a bunch of genuine Nissan parts to replace damaged or missing components that only Nissan make. From the top left: New rubber boot that surrounds the gearstick (old one damaged), a cup holder that replaces the ash tray (yes it's not genuine Nissan but fixes a fatal flaw all S13s have had), new bonnet rubber stoppers (was missing 4 out of a potential 6) and a new drivers' side door handle (old one cracked and damaged).
In regards to the cup holder, for some reason Nissan decided drivers had no need to put cups or cans of absolutely anything in their cars in the late 80's to the early 90's. The work around that most drivers accepted was to remove the ash tray, which left a hole that was big enough for cups to fit in. While it did work, it was far from ideal as cups weren't exactly held securely. Thankfully, TAARK has seen a need and gone to the effort of fabricating a direct replacement for the cup holder that sits where the ash tray normally would... I honestly don't know why it hasn't been done before!!! $35 well spent in my opinion :)
Item #6: Turbo rebuild kit to hopefully sort out the smokey exhaust once and for all.
Item #7: Gasket kit for the turbo to compliment the rebuild kit above
Item #8: New door cards to replace the existing ones which are wayyyyyyy too tired and have had holes drilled in them for some reason (pic incoming)
Item #9: Replacement power steering reservoir to replace the one I hacked up when doing the Pod filter enclosure which I will no longer be using
Like I said, plenty of motivation :) Got to make all the $$$ I spent on these parts worthwhile!! Thanks to the arrival of the Turbo-related goodies, I decided my next project would be to knock this turbo on the head for good. With the investigation performed previously, I had come to the conclusion that a full rebuild was in order - yet another task I've never undertaken before. How hard can it be right?
One of those things on my to-buy list as we continue to flesh out our garage with tools and such is a work bench. Unfortunately it is on the to-buy list for a reason, so the outdoor setting had to do. Mind you it wasn't all bad, plenty of light and fresh air :) Now normally I just wing any mechanical work wherever possible (like any decent male would), but a turbo is something that is pretty critical to get right. The guy I bought the turbo rebuild kit off of provided a brilliant DIY guide complete with pictures and detailed explanations, so the iPad took on the role of User Manual for the day.
The more I work on cars, the more I hate cir-clips... A turbo is no exception, rife with the bloody things!! Consequently, an armament of cir-clip pliers was required. Internal. External. Thin. Fat. 0 degrees. 90 degrees. Long. Short. The pair on the right I had to buy specifically for doing this job, as I needed the extra opening width for a big-ass cir-clip. $50 thanks! (sigh) anyways...
Given that the turbo was already off the engine and half apart from prior investigations, most of the hard work was already done (at least that's what I thought). I continued stripping bolts and components off it until...
... I was left with this: the turbo core. This is responsible for housing all of the bearings, as well as feeding oil and water around the core to keep temperatures down. It also has seals that (if I were to guess) would be the cause of my problems.
Apparently the black bit in the center should just fall out... after 15 minutes of being soaked in Inox and multiple attempts at bashing it it still didn't fall out. I decided to take a gamble for the sake of saving time and drilled a hole so I could get an edge to lift from. Thankfully I didn't damage anything in doing this, WIN!!! Just had to be sure that I removed all of the metal shavings... historically speaking, fine bits of metal and bearings haven't been the best of pairings.
Removing the guts of the thing was pretty straight forward... cir-clip, bearing, cir-clip, bearing, o-ring... have I mentioned how much I hate cir-clips? The ones in the core were tiny! I ended up having to use 2 scribes to get the things out, and the second you do that you lose all articulation, so you end up playing around with them for 10 minutes just to get them out. As a result, I would like to revise my first sentence for this paragraph...
Removing the guts of the thing was pretty straight forward provided you acknowledge that some things are just going to take some time and patience :)
Some time and patience later, I ended up with a completely gutted core =P
You can see here the difference in components, old and new. I hope that you, the reader, are intelligent enough to work out which was which :) it was pretty amazing though knowing that I was about to put all new shiny bits back in.
I took the time to soak the entire core in some degreaser to try and remove as much grime and sediment as I could. Thankfully, the colour of what's left reveals that it was indeed a worthwhile endeavour.
Rebuilding the turbo with new components was simply a reversal of the removal procedure. Just re-install everything in the order they came out with a healthy lathering of assembly lube. The instructions really did a great job of going step by step, so I could be 100% sure I didn't miss anything.
Core done :)
Re-assembling the core with the housings was unfortunately a lot more difficult than I was hoping. I tried to take as many pictures as I could along the way so that I had references for when I got to this point, but it turns out that I did not take enough. After a bunch of experimentation I eventually got it to a state I believed was correct, but there was one massive oversight I forgot to take into account. The compressor wheel is actually balanced, and needs to be orientated correctly in relation to both the locking nut and the shaft to prevent unnecessary vibrations. I marked the turbine with the locking nut, but forgot to mark the turbine in relation to the shaft. Here's to hoping it all works out =| I guess I'll know soon enough!
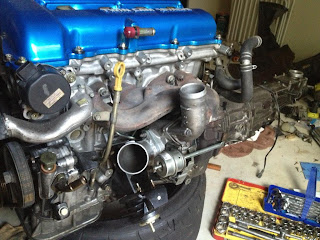
Turbine aside, the turbo fitted back to the engine block beautifully :) I also took the liberty of replacing all of the gaskets related to it in the process of bolting it back on.
Lesson's learnt?
- Don't ever take your turbo off while the engine is still in the car... It was hard enough accessing all of the bolts with the engine out!
- Mark absolutely everything that has to be re-installed in a specific way
- Take more photos
All things being equal though, it could have gone a lot worse. I now have a fully rebuilt turbo, with new seals, gaskets and bearings. I've done as much as I can to get rid of the oil leak. I've also gained a lot of knowledge and experience. I'd call that a win - even if the turbo is now potentially unbalanced and self-destructs as a result. In all honesty given how small the turbine is and how low-volume it is, I don't think it's going to be too much of a problem... because, you know, I have so much experience and all =P
On a side note, while I was shopping for assembly lube I came across some high temperature clear spray paint. Perfect for the engine bay, to help keep the white white and clean, whilst repelling heat. Only did a test section (above) but should look and wear quite well methinks!
Next project? I'll give you a hint... it involves the engine bay, a welder, a grinder, some sandpaper and some paint. Stay tuned.


