Sunday, February 26, 2012

Consolidating Colours pt. 2

So time to carry on where I left off... Given the amount of painting I had to do today, I decided to start off with the bonnet, to give my hand a break while I prepped the fenders.  The bonnet was already sanded from yesterday, so got the finger squeezing goodness off to a flying start... 


Four coats later, the bonnet is done!  Had to make sure I got all the edges as well, so that when the bonnet is on, you don't see any white when its closed.


I then started prep work on the guards.  It was good to finally get into them, as I'd spent a good 20 hours just waiting for fibreglass and bog to dry.  I thought the sander I bought yesterday was absolutely brilliant, but the rate at which it ate through bog?  Man its quicker than Kirsty Allen eating cake!!  Had to take the guards back quite a bit though, as there were several layers and qualities of paint on them which would've resulted in a very uneven paint job had I left them.  


I also had to add a second sheet of fibreglass to the indicator holes.  Due to gravity, the fibreglass dried with a bit of a curve to it, so when I was sanding back I was also sanding back fibreglass.  Unfortunately this meant that the strength of it was compromised, so a second sheet needed to be stuck on there to compensate.


After the guards were painted...


... it was time to fit everything back on.  Yes, I decided to keep one eyelid white. Hey, had to honour her heritage!!  The only purpose of test fitting the panels was to make sure that they all lined up before I bolted them in properly.  Theres a fair bit of play in each of them (i.e. bonnet had to move right by 3mm, front bar needed to shift over a good 8mm, the front left guard had to be pushed in in the middle, and the headlight covers/eyelids needed to be adjusted to make sure the curves still lined up) so it was good to make sure they were correct before I secured them.


Her all back together! Including lights, number plates, and finally a Nissan badge :)


Ive gotta say, she looks so much more meaner now she's all the same colour... The orange indicators also contrast with the black a lot better than they did with the white too.  


Also painted the mirrors while I was at it :)  Much quicker and easier than anything else I tackled this weekend.  You can see in this picture though that the new panels need some loving so that the sheen is consistent over the whole car.  I'm planning on waiting for the paint to properly cure before I give it a polish, and try to bring some of that gloss out.  After all, it is a gloss black that I painted it with... I would've liked to have seen more gloss and less satin.  Don't quite know why that came out this way actually =S


Anyways, stay tuned.  This has definitely sparked my inner mechanic to keep going!

Saturday, February 25, 2012

Consolidating Colours

After quite a lull in activity, I decided to finally pull my finger out of my ass and do something to Stacey... it's been way too long since I've spent some decent time on the car, and to be perfectly honest, I miss it!

One thing thats been on my to do list ever since I got the car was to consolidate the colours, so that the whole car is the one colour.  I did it to some degree back at the start of the year, but it was time to finish the job.

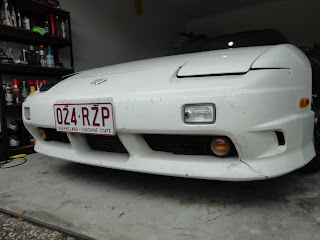
Before I get too far into it though, here's a reminder of what I'm starting with:


Although the car is now 2 colours (or you could argue 5 if you count the different shades of white), it's still too many...


I also wanted to get rid of these indicators... They were put in due to a confusion with legalities from the previous owner, but after figuring out they weren't needed, they were left in simply to fill the hole.  They don't house any bulbs in them, so there's no point in keeping them. Given what I was wanting to achieve this weekend, figured it would be a great opportunity to get rid of them.


Took this photo while I was in the process of pulling things apart... reckon she looks pretty good with the hood off :)


This is whats left after you pull off all the panels... the bonnet, the front fenders, the pods and the front bumper, all gone.  Makes you appreciate the purpose of this car - its business and not a lot else... Everything that's there serves a purpose, with not much care for aesthetics.


Kim you smart ass!!!!


Prepping the panels for painting... I didn't see any point in going right back to bare metal, given that this isn't a professional job by any means.  Just needed to rough up the paint enough so the new paint would stick.  Bought an orbital sander specifically for the job... WHY DIDN'T I GET ONE SOONER!!!! Seriously, it made sanding so easy!


The bonnet and the front bar prepped... I had to take the front bar back a fair bit further though, as there was quite a bit of wear and tear on it.  It may look like I haven't done anything to the bonnet in comparison, but the lack of shine is proof that I've taken a good coat or 2 off of it.


The crude spray painting booth in our garage =P  Front bar was quite tough to paint evenly though because there's simply that many curves, edges and angles on it.  Its not easy to get to some of the surfaces either, but I got there after quite a few cramped fingers.


Also time to see what that Nissan badge looks like on!!  This will be glued on at a later stage after I've sorted everything else out.  


Front bar test fitted... I personally think it looks great!  Need opinions though, Should I leave it at this finish or top it off with a clear coat to match the rest of the body?  I personally would love to do the rest of the car in such a finish, but it means that the whole car will be done as a rattle can job, and won't hold up anywhere near as long as a proper paint job.


Also started patching the holes from the indicators... Fibreglassing them was the first thing I did today, as the resin takes 12 hours to dry.

Stay tuned for an update tomorrow with part 2 of all these shenanigans :)  I really can't wait to see how it looks when its all back together!!

Saturday, February 11, 2012

Little Bits of Progress

Time for an update methinks, it's been too long since I've posted anything, but then again it's also been a while since I've done anything.  The last couple of weeks have seen me distracted by many distractions, and to be perfectly honest, Stacey hasn't been high on my priority list... Anyhow, there's been a few little bits and pieces that I've been slowly working on, so have a read!

The indicators have always been problematic since I got the car... The front bar was always missing them, which basically led to my indicators blinking fast (lower resistance due to less bulbs = indicator relay switching on/off faster because it can).  While it's not necessarily a problem, it does add to the 'there's something out of the ordinary, therefore Mr Pig should investigate' issue that plagues us import drivers.  Given the nature of the car and what the previous owner was trying to achieve, I couldn't not go genuine when it came to fixing this problem.

Enter these: Genuine Type X Front Indicators.


We'd tried experimenting with some various bodge-jobs to see if we could slow the indicators down, but all of the bulbs were rated too low.   Once I picked these up we worked out why... A standard indicator bulb is rated @ 12 Volts, 5 Watts.  The bulbs that are supposed to be used in this case are 12 Volts, 16 Watts - over 3 times as powerful as a standard bulb.  Not something thats overly easy to come by from your local auto store, but found something at a Global Auto Spares.


This is what they look like installed... the black garnish isn't easy to see at the best of times, but, thats the way they did it back then, so thats the way its going to be done here.


Told you they were significantly brighter than a standard indicator bulb ;)

I also had issues with the left headlight... found out on a dark and rainy night that the bulb had stopped working, the lack of visibility kind of gave away =P It wasn't blown, it just simply wasn't getting power.  About 4 hours of troubleshooting led to a blown fuse (turns out this car has one fuse for each headlight) and it blew another fuse the second I turned on the lights.  Could not for the life of me figure out why, the end solution was just to run a higher rated fuse.  Far from ideal, far from safe, but there was nothing out of the ordinary with the electrical system from what I could gather... stumped!

Now when I got the car, it came with an air/fuel ratio gauge.  It was never plugged in, just bolted to the side of the center console.  For the uneducated, it basically measures the percentage of oxygen thats coming out of your exhaust, and lets you know whether you're running rich (too much fuel -> bad economy) or lean (not enough fuel -> can blow up your engine).  Decided today that it needed to be plugged in, because I was bored and its not a terribly involved job.


It never ceases to amaze me how quick and easy this interior is to pull apart... All I was doing here was running/tracing wires, and soldering the wires into their respective sources.


Given that the boost gauge was already mounted on the steering column, I decided to mount the new gauge on there as well just for ease of reading.  A quick drill, a quick screw, and thats the two brackets mounted.  For the record, I am aware that my instrument cluster is in terrible condition!!


Here they are installed... sorry for the terrible quality picture, camera kept focusing on the steering wheel and I couldn't get it to focus on the gauges themselves.  I moved the boost gauge to the top just to make it easier to read, as it's a little bit more vital than my A/F ratio.  For those of you who are concerned that I put it right in front of my speedo, don't worry, you can still see the needle fine! Pretty sure boost is a little bit more critical than speed anyways...


The interior as it sits now... Gauges sorted out, center console finally finished properly, black gear boot instead of a dirty white one...


Everyone loves a bit of sticker love :) 

The next things on the to do list:
- Replace Oxygen sensor (found out from todays exercise that my existing o2 sensor is a little bit on the wrecked side)
- Paint front end, so the whole car is one colour
- Get some wheels that sit properly instead of running stupid spacers (looking at April at this stage based on when they're arriving in the country)

Watch this space!