Right!!! My sincere apologies for the monumental amount of time between this post and my last one... Reasons are quite simple, all that was really holding me up was the welding PPE (personal protective equipment) that was ours but had been lent to someone else... long story short it was no mean feat getting it back due to clashes in schedules and unexpected events occurring on both sides of the fence.
Unfortunately I was at the point in this project that it was really holding me up not being able to weld. While I had other things I could be doing, this was the biggun. Weld bits and pieces in the engine bay, sort out the various imperfections, re-paint it and then get the engine back in - this would then allow me to then focus solely on the exterior. I can appreciate the scepticism some of you may be feeling, especially given that in the previous posts you would have certainly gotten the impression that what I was working on would change on a minute by minute basis... But let me assure you, I couldn't rightly start on the exterior when I was so close to finishing something completely.
On the topic of the exterior, all of the over fenders arrived from Japan not long after my last blog post. DMAX, 30mm front and rear, which is a hell of a lot cleaner than running the ridiculous bolt ons I had before. Enough talking, let me show you some pictures :)

Rears taped in place, sits beautifully with the stupid spacers I'm running!

Fronts installed, little bit 4WD spec thanks to the suspension lift but that will change once I have an engine back in I'm sure!

Entire view from the front.

Entire view from the back.
All in all very very happy :) For those that are wondering, the white comes from the gel coat that they seal them with after manufacturing - that will all be painted in due time once I've filled and primed them to remove any imperfections. My goal is to properly blend them in (vs. riveting) to get a completely smooth look... it's going to be a lot of hard work I know but I think it's definitely going to be worth it.
Any-dang-ways, onwards with what's been keeping me from doing anything for so long!

You may have remembered I cut up my old door for practise... it was a disaster. You can see on the first two cuts I had a lot of blowouts, no success whatsoever. I figured it must have been due to not enough metal, so using the first thing I could find (which just so happened to be a tool for removing discs off an angle grinder - totally don't need it), I had a bit more success. I will admit straight away, it's not clean, it's not pretty, but so long as it does the job, I can live with it. What I'm welding in isn't going to be under a lot of force at all so hopefully this will be enough. Plus, there's plenty of things you can do to tidy up imperfections as you will see later on.

This was proof in the pudding as to how long it had been... this much surface rust had built up on my fabricated goodness!
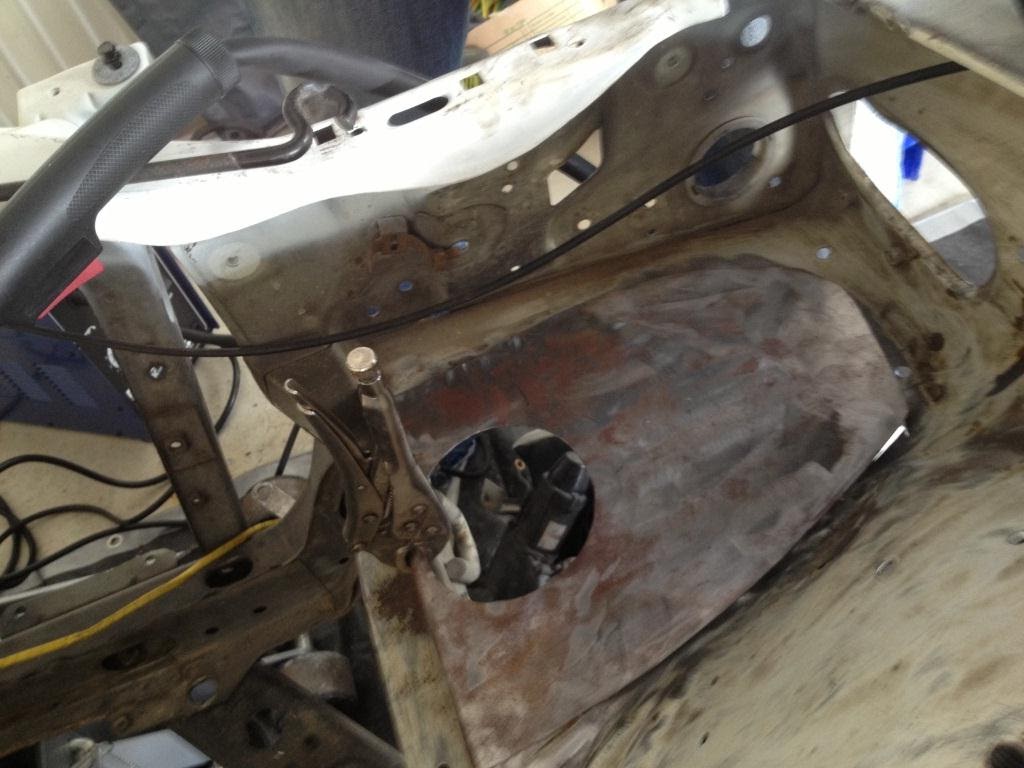
I figured my first job was to weld in this battery tray replacement. Based on how this went would dictate my feelings regarding welding up other bits and pieces in the engine bay... needless to say after my practise I was filled with optimism!!! Clamp in, it was time to start tacking.

My original goal was to get a nice bead of weld around the entire battery tray, even if it was only in inch-and-a-half sections to keep the heat down. Unfortunately the blowouts kept occurring thanks to the sophisticated settings on our gasless-MIG welder from Super Cheap Auto. In regards to amperage? I got a choice between 'MIN' and 'MAX'... if this was a buffet I'd be very disappointed! Had to do what I could with what I had though, so I ended up just tacking the whole damn thing in. Hey now, it worked!

Based on the success I had with this I decided to attack a nearby crack... By this stage I'd realised that if I had plate behind where I was welding I had more success, so I cut sections out of my door and reinforced where I could. It wasn't a perfect solution but it helped me achieve what I was chasing.

Looking underneath revealed that a lot of welds had indeed penetrated which was good news. You can also see the burn marks from where I set fire to the sound deadening on the inside of the wheel wells... whoops!! Thankfully I had a bottle of water nearby that helped to quell any spontaneous combustions that decided they wanted to be friends with my car. Needless to say my fluid supply turned fire extinguisher was incredibly handy :)

Just an action shot to prove it was me I guess =P Can I just say, working in a flanno really does add to the manly-ness factor *flexes*

Yet more flames as I continued to weld on the other side of the engine bay =\

Yeeeaaaahhhh I made a real mess of it... I welded, blew out, pooled molten metal to fill the hole, blew out some more... rinse and repeat. I eventually got it to a point where I didn't have any more holes, and decided to call that as done as it could be with my skills. The cracks were gone and replaced with metal, it's got to be better than it was right?

The next step of course was grinding... You probably can't see much of a difference between this picture and the picture above, and to be honest I wouldn't really expect you to see much of a difference. It still needed to happen though to move onto the next step:

Bogging.

Lots of bog!! There was unfortunately a lot that I needed to do thanks to the dodgy welding, but I suppose things could be worse... Cue Monty Python's 'Always look on the bright side of life'.

This was followed by sanding... sooooo much damn sanding... At the very least you can certainly get an idea of the difference it makes.

While I was sanding I found areas that needed re-bogging around the battery tray. I decided to at least do something while it dried, so I started prepping some of the engine bay for painting. I had originally already painted the rad support, but I kind of messed it up so I sanded it back and included it in the area to paint properly.

Much better!!! So much cleaner, tidier, whiter etc. etc.

I put down just a cheap-ass rattle can white on the bottom, and finished it off with a top coat of high temperature clear. To be honest I have no idea how it's going to wear colour wise (i.e. if the white will discolour with heat) but at least it's sealed and should help repel dirt. I can acknowledge that there are areas that are still 'lumpy' thanks to the bog, but the way I see it, by the time you get the engine and all its auxiliaries in there it shouldn't be too bad. Here's to hoping! Regardless, I'm still very very VERY happy with how it's turning out. 100% on what it was and then some :)

I continued to move my way around the engine bay. Masking all of the random fittings, pipes and cables was indeed tricky, but it was a sacrifice I could live with due to being too lazy to remove everything completely.

I kept working my way around the bay in sections so I knew where I was up to. That's the problem with a clear coat, you have no real indication of what you've just done! It also gave me something to do while I waited for the coats to dry in that I could prep another section. There was a hell of a lot of dust from all the sanding, so just clearing that and rubbing it all down with wax and grease remover was a good little job to keep myself busy.

I only started off with buying 3 cans of white - I knew I would need more but I had no idea how much I would need. I had bought them ages ago though as I thought I would be welding a lot sooner than what I had. By the time I came to buy more, it turns out that particular brand I bought wasn't stocked any more, so I had to buy a different brand. This new stuff had the fantastic benefit of being sprayed upside down, which helped massively with all the odd angles and surfaces I had to coat - unfortunately it also ran like a mofo, so I finished doing all my coats, sanded back the runs and topped it all off with yet another brand of white before finishing it all off with clear.


And here we have the finished product!! I thought I'd include a before and after so you have an idea of what I accomplished.


One of the main reasons for all of this work was to tidy up where the battery tray used to reside... and needless to say I am DAMN chuffed with how that has come up :) Once again I am aware that there are a few imperfections, but I simply cannot argue with the difference that has made to the overall cleanliness to the engine bay.
You know I have to laugh, since getting that PPE it has taken me only 2 weekends (not even full weekends) worth of work to get this done... I can only imagine how far I could have been along if things were different. Regardless, better late than never hey? From here I'll be working on re-fitting everything back into the engine bay. First all the auxiliaries and cable looms, then the engine itself. I must admit I am damn excited to see the difference once this is all back together... between the rocker cover, strut brace, cleaning and degreasing of as much stuff as I can and the re-painting of the entire engine bay, I can only imagine the difference all of this work has made.
Stay tuned to see just how much :)