Many would consider this an update of sorts vs. a considerable progress demonstration... I'd also agree, so let me update you!

After finishing the prep work on the rear guards, I must say I'm rather pleased with how they've come up! Oodles of unnecessary clearance, but more importantly they're now sealed from the cabin. I did seriously contemplate cutting the sikaflex down for the sake of making everything as tidy as possible... however thanks to said sikaflex I now don't know where the guard joins with the inner skin. The last thing I want is to re-seal thanks to over cutting, and I have an inkling of a feeling I'd be doing it several times before I got it right. Given that the new guards are going to cover it anyways, I'm going to employee procrastination-like techniques and pass them off as working smart, not hard =P

I finally got around to obtaining some new (read: second hand) door cards, as I've always thought my existing ones were rather tired. My main gripe with them pertained to a bunch of random screw holes - I always thought that someone had mounted something there, so I wanted a pair that didn't have them. It was night time when I picked up the replacements, so I didn't even notice that they had the exact same screw holes... nag dabbit!! After doing some research, I discovered a couple of things - 1) All Silvia door cards came with carpet inserts vs. the vinyl looking sections above. 2) It's really common for people to pull the carpet inserts out which leaves the vinyl looking sections above. 3) The holes exist for the purpose of using a vaccuum to seal the carpet to the rest of the door card, holes that now appear after removing the carpet insert. End result? I now have 4 door cards to pick the best 2 from, and I'll have to deal with the holes. Yay. At least they were cheap :)

I've had these for a while, but it was only after I did a massive clean up in the garage that I remembered I had yet to mention them. Compliments of Casey, an Apexi intake pipe (top) and a PBM front/dump pipe (bottom). The intake pipe exists to replace the Frankenstein setup that I had previously - what can I say, it was free and did the job! It was also incredibly untidy and looked like a dogs breakfast, so in the spirit of a bunch of small things that will make a big difference, voila. The front/dump pipe is necessary for the end goal of keeping this as legal as possible. For aesthetic reasons, I want to keep this car as low as possible whilst keeping it legal. What I am working on is having the chassis rails at lowest legal height (100mm) and adapting everything else to sit above the rails - not an impossible task. Interestingly enough, S13s came illegal from factory - the front pipe would actually dip to around the 93mm mark before any suspension changes were even considered. Most aftermarket solutions also fail to address this fact. This lovely little number above actually comes out sitting above the chassis rails, which allows me to do whatever I want with the suspension. I will need custom fabrication to make the rest of the exhaust comply, but this is one very important piece of that puzzle.
Rear guards finally arrived from Japan too! Stay tuned for pictures on fitment and what I'm shooting for :) but enough of shiny new things, onto what work has been done.
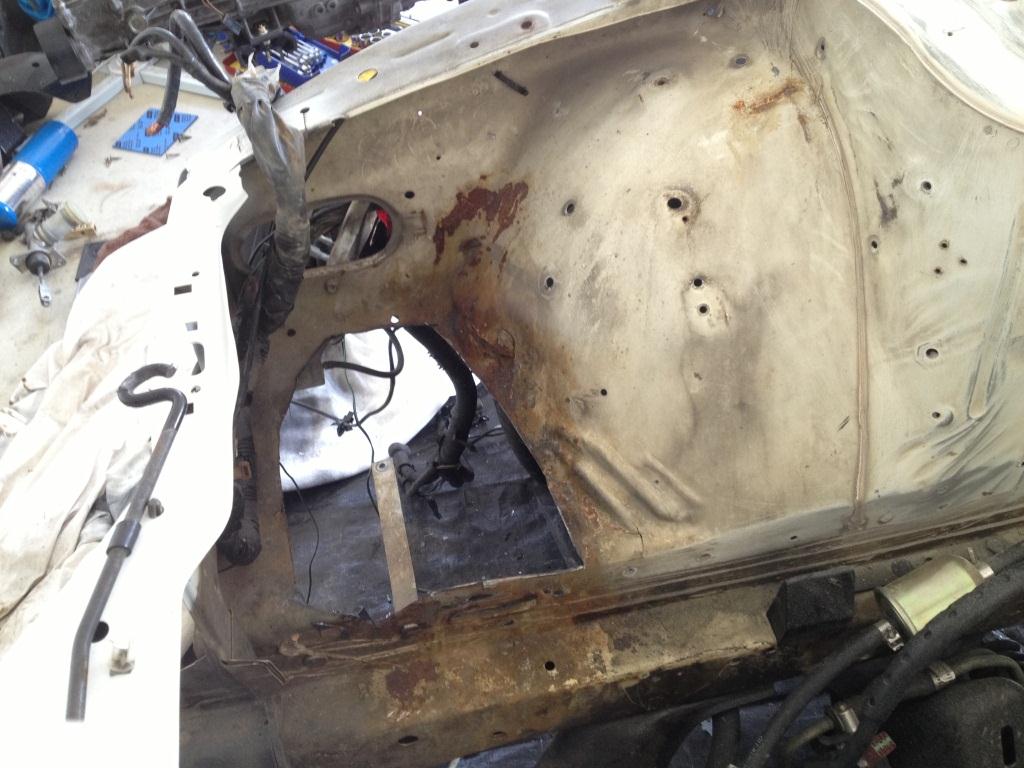
The battery tray is something that has been bugging me for a very long time. I keep putting it off due to the fact that I knew it was going to be a bit of a time investment. I decided to bite the bullet and just get it done. Above you can see what I'm working with - I cut out all of the haggard metal so I at least had something decent to start with - unfortunately this left me with quite a significant area to fill.
Finding decent weld-able metal was not easy at all. I must have visited 4 or 5 different stores in the hope of getting an off-the-shelf sheet I could work with, all with no luck. Everything was either aluminium or galvanized, none of which are weld-able with a MIG. My next idea was to visit a steel fabricators, but before I enacted that plan, I realised that I did in fact have a wrecked door I was just going to throw out, which is made from the steel I'm looking for. Light bulb!

I proceeded to trace out the shape I was needed...

... and thanks to the angle grinder of doom, I ended up with a section I could work with :) After I finished cutting it, the damn thing just would not lift out. I was trying to figure out if there was a bit I hadn't cut, but by using a screw-driver as a crowbar, I heard a distinct 'un-sticking' noise (to use the scientific vernacular). Some perserverence revealed a solid bit of reinforcement in behind the outer shell... makes sense in hindsight, but this isn't something you can see from the inside of the door. Anyhow, I digress!

I replaced the cutting disk on the angle grinder of doom with a flapper disk - you dirty minded people stop right there! Heaps of sand paper stuck to a rapidly spinning disk equals all paint and glue stripped in no time :) I then employed my newly developed metal working skills to achieve a shape that would help with what I was hoping to accomplish.

I also took the liberty of marking and cutting a hole for the intercooler piping, as it's a hell of a lot easier to do it while I can actually work with it vs. dealing with a cramped space. I'm sure you'd agree that that is going to work quite nicely!!!

Given that I haven't welded since 2003 (over a decade ago... wow), I thought it might be wise to get some practise in. I figured the door would be as good a test piece as any, especially given that it's the exact same metal I'll be working with. This will allow me to get the wire feed and amperage right before I attempt the real thing. The above picture shows you just how effective that flapper disk is at stripping whatever is underneath it!!!

The one thing that happens regardless of what I'm doing is sweep. It's amazing seeing how much crap comes off the car while I work on it - especially when it's all condensed into a dustpan =\ I've emptied too many of these recently... is there going to be anything left of Stacey when I'm done?

Door prepped for practise! I'm sure there's better ways of practising, but for all intents and purposes, if I can fill those lines without getting any warping or blow outs, I'm going to call that a validation of my ability to weld ;)
I then found out our welding PPE had been lent to someone who is currently overseas... (sigh). Still plenty of prep work to be done though, so onwards.

One critical thing is to remove all of the remaining wiring from the engine bay. The less things in the way, the better!! A lot of cable ties lost their lives for the greater good here... lest we forget.

I also took the time to address the cracks in the engine bay to get them ready for welding. First task was to beat them into shape so that all the cracks at least lined up, and then all paint is removed so I've got a clean surface to work with. It's amazing what you can accomplish with a wire brush that's attached to a drill...

Here you can see the engine bay completely prepped!! Nothing overly hard, everything just takes time. There's a lot of odd surfaces, holes, bumps and obstructions you have to take into account, plus random components that you wouldn't normally pull out are also removed for the sake of making things easier.

Needless to say, the sway bar does make for a fantastic (albeit uncomfortable) seat, with the rad support playing the role of arm rests, and leg room facilitated by the transmission tunnel. Add good music and beer, and a tedious task becomes slightly less tedious.
Next?
- Test fit guards
- Practise welding
- Perform welding for real
- Paint engine bay
- Re-assemble engine bay
- Re-insert engine
- Move onto body
No promises on time frames people, but it will happen. See you next time!