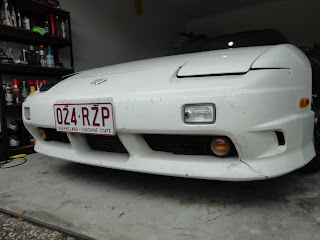
Time for an update methinks, it's been too long since I've posted anything, but then again it's also been a while since I've done anything. The last couple of weeks have seen me distracted by many distractions, and to be perfectly honest, Stacey hasn't been high on my priority list... Anyhow, there's been a few little bits and pieces that I've been slowly working on, so have a read!
The indicators have always been problematic since I got the car... The front bar was always missing them, which basically led to my indicators blinking fast (lower resistance due to less bulbs = indicator relay switching on/off faster because it can). While it's not necessarily a problem, it does add to the 'there's something out of the ordinary, therefore Mr Pig should investigate' issue that plagues us import drivers. Given the nature of the car and what the previous owner was trying to achieve, I couldn't not go genuine when it came to fixing this problem.
Enter these: Genuine Type X Front Indicators.
We'd tried experimenting with some various bodge-jobs to see if we could slow the indicators down, but all of the bulbs were rated too low. Once I picked these up we worked out why... A standard indicator bulb is rated @ 12 Volts, 5 Watts. The bulbs that are supposed to be used in this case are 12 Volts, 16 Watts - over 3 times as powerful as a standard bulb. Not something thats overly easy to come by from your local auto store, but found something at a Global Auto Spares.
This is what they look like installed... the black garnish isn't easy to see at the best of times, but, thats the way they did it back then, so thats the way its going to be done here.
Told you they were significantly brighter than a standard indicator bulb ;)
I also had issues with the left headlight... found out on a dark and rainy night that the bulb had stopped working, the lack of visibility kind of gave away =P It wasn't blown, it just simply wasn't getting power. About 4 hours of troubleshooting led to a blown fuse (turns out this car has one fuse for each headlight) and it blew another fuse the second I turned on the lights. Could not for the life of me figure out why, the end solution was just to run a higher rated fuse. Far from ideal, far from safe, but there was nothing out of the ordinary with the electrical system from what I could gather... stumped!
Now when I got the car, it came with an air/fuel ratio gauge. It was never plugged in, just bolted to the side of the center console. For the uneducated, it basically measures the percentage of oxygen thats coming out of your exhaust, and lets you know whether you're running rich (too much fuel -> bad economy) or lean (not enough fuel -> can blow up your engine). Decided today that it needed to be plugged in, because I was bored and its not a terribly involved job.
It never ceases to amaze me how quick and easy this interior is to pull apart... All I was doing here was running/tracing wires, and soldering the wires into their respective sources.
Given that the boost gauge was already mounted on the steering column, I decided to mount the new gauge on there as well just for ease of reading. A quick drill, a quick screw, and thats the two brackets mounted. For the record, I am aware that my instrument cluster is in terrible condition!!
Here they are installed... sorry for the terrible quality picture, camera kept focusing on the steering wheel and I couldn't get it to focus on the gauges themselves. I moved the boost gauge to the top just to make it easier to read, as it's a little bit more vital than my A/F ratio. For those of you who are concerned that I put it right in front of my speedo, don't worry, you can still see the needle fine! Pretty sure boost is a little bit more critical than speed anyways...
The interior as it sits now... Gauges sorted out, center console finally finished properly, black gear boot instead of a dirty white one...
Everyone loves a bit of sticker love :)
The next things on the to do list:
- Replace Oxygen sensor (found out from todays exercise that my existing o2 sensor is a little bit on the wrecked side)
- Paint front end, so the whole car is one colour
- Get some wheels that sit properly instead of running stupid spacers (looking at April at this stage based on when they're arriving in the country)
Watch this space!


No comments:
Post a Comment